
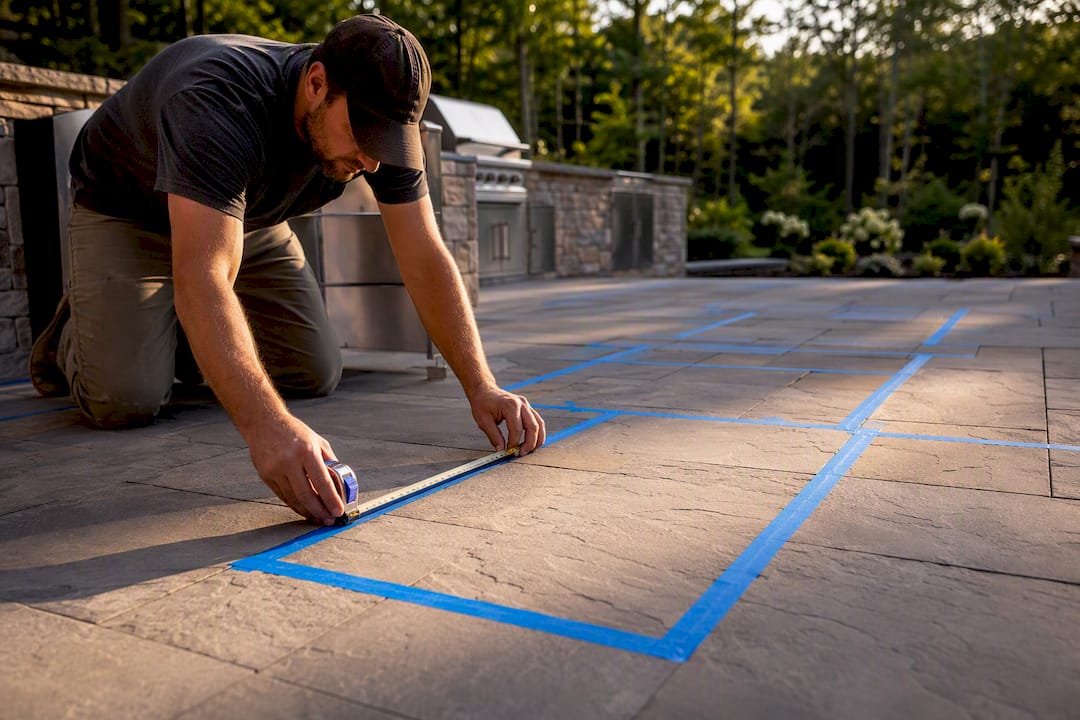
The right outdoor kitchen layout comes down to three things: how much space you have, how you actually cook, and whether you want it usable year-round. Linear layouts fit narrow side yards and small patios. L-shapes work best when you’re entertaining and want a social bar edge. U-shapes and galley designs suit multi-cook households with room to spare. Match the shape to your footprint and habits first, then build clearances and covered/uncovered material choices around that decision.
TL;DR:
- A U-shaped layout offers the most counter and storage space, ideal for households that cook together or host large groups regularly.
- Minimum clearances of 42 inches for single cooks and 48 inches for multiple cooks or appliances are critical for safety and functionality.
- Proper wind and smoke management, such as vent hoods or screens, are essential to prevent smoke from drifting toward seating areas or into the house.
- Covering an outdoor kitchen expands material options but requires careful ventilation to prevent heat and smoke buildup, especially under roofs.
- Planning should focus on task flow from cold storage to prep, cooking, and serving zones, ensuring smooth movement and safety during use.
Table of Contents
- Common Outdoor Kitchen Layout Ideas: What Each One Solves
- Designing Work Zones and Workflow for Efficient Cooking
- Sizing, Clearances, and Wind and Smoke Management
- Materials and Weatherproofing: Covered vs. Uncovered
- Appliances and Features to Plan For
- 25 Layout Ideas by Yard Type
- Planning Checklist and Budget Signposts
- Hands-On Planning Tips From Divine Landscaping
- Accessibility and Universal Design in Outdoor Kitchens
- Seating and Dining Integration
- Lighting Design and Placement
- Storage Solutions and Outdoor Cabinetry
- Fire Safety and Ventilation in Outdoor Kitchen Design
- A Build-First Take on Outdoor Kitchen Layout Ideas
- How Divine Landscaping Turns These Ideas Into a Finished Kitchen
- Where to Go Next for Specs, Diagrams, and Design Ideas
- Sources
Common Outdoor Kitchen Layout Ideas: What Each One Solves
Every outdoor kitchen layout solves a different spatial problem, and picking the wrong one for your yard is the single most common regret homeowners report after the build is finished. Design experts point out that the top mistake isn’t a bad appliance choice. It’s choosing a layout for looks instead of cooking style or site conditions, which often means the grill ends up far from the prep counter or facing straight into prevailing wind.
The four layouts that show up in nearly every backyard kitchen planning guide are linear, L-shaped, U-shaped, and galley/island. A fifth variant, the corner or peninsula, borrows from both the L-shape and island concepts.
- Linear (straight run): A single continuous counter against a wall, fence line, or railing. Linear works best for runs under about 10 to 12 feet, making it the natural fit for narrow side yards, tight decks, or anyone easing into their first outdoor cooking space. The tradeoff is limited counter space for more than one cook, though a well-planned 10-foot run with vertical storage can still fit a grill, fridge, trash pull-out, and prep zone.
- L-shape: Two counter runs meeting at a 90-degree corner, typically needing a footprint around 10 by 10 feet. This shape shortens the walking distance between stations and creates a natural bar edge where guests can sit without crowding the cook. It’s widely considered the most broadly useful layout for entertaining because one leg handles cooking while the other handles serving or seating.
- U-shape: Three connected counter runs wrapping around the cook on multiple sides. U-shaped kitchens generally require at least a 12 by 12 foot footprint to keep the interior aisle workable. This layout suits households that cook in pairs or host large groups regularly, since it offers the most total counter and storage of any shape.
- Galley/island: Two parallel counters facing each other, or a single freestanding island with full access on every side. Galley layouts need at least a 48-inch aisle between the facing runs. A true island needs clearance on all sides for foot traffic, which makes it a strong choice for open patios where the kitchen becomes a standalone feature rather than a wall-hugging structure.
- Corner/peninsula: A hybrid where one counter run extends outward from a wall-mounted section, creating a partial wraparound without the full footprint of a U-shape. It’s a practical middle ground for yards that can’t quite fit a U but want more than a straight line.
Storage capacity and multi-cook ability scale directly with footprint. A linear layout holds the least, a U-shape holds the most, and the L-shape sits in the middle while offering the best social flow for the space it uses.
Designing Work Zones and Workflow for Efficient Cooking
Layout shape matters less than task sequence. An outdoor kitchen that looks great on paper can still be miserable to cook in if the zones fight each other, which is why design experts recommend defining the cooking heart first, meaning the grill or pizza oven, and building everything else around it.
The sequence that works in nearly every functional kitchen, indoor or out, runs in one direction:
- Cold storage first. Place the fridge or beverage cooler at the entry point of the workflow, away from the direct heat of the grill so the compressor doesn’t work overtime.
- Prep zone next. Counter space and the sink belong beside each other, since most prep tasks involve moving between cutting and rinsing.
- Cooking zone third. The grill, side burner, or pizza oven sits at the far end from the fridge, reducing the chance that someone opens the fridge door while you’re mid-sear.
- Serve zone last. A landing counter or bar near the cooking zone lets you plate food without backtracking through the whole layout.
This left-to-right (or mirrored) flow cuts unnecessary steps and keeps foot traffic from crossing directly through the hot zone. Seating deserves the same discipline. Bar stools tucked against the cook’s back or a dining table placed in the direct walking path between prep and grill will cause collisions the first time you host more than four people. Raised bars on the opposite side of the counter, or a split counter that separates cooking from seating entirely, solve this without sacrificing the social layout homeowners usually want.
Pro Tip: Stand at your planned grill position and mimic flipping a burger, then reaching for a plate. If your elbow would hit a wall, a fridge door, or a guest’s shoulder, move something before you pour concrete.
Sizing, Clearances, and Wind and Smoke Management
Clearances are the part of outdoor kitchen planning that homeowners underestimate the most, and they’re also the easiest to get wrong on paper because a floor plan drawing doesn’t show elbow room. A minimum walkway of standard recommended width between stations is the baseline most designers use, and that number climbs fast once you add a second cook or a swinging appliance door.
Here’s how the numbers actually break down:
- 42 inches minimum for a single-cook aisle with no seating nearby.
- 48 inches or more for galley layouts, multi-cook setups, or any aisle where someone might be bent over an open fridge door while another person walks past.
- Refrigerator and door swing clearance needs its own buffer, typically an additional 6 to 12 inches beyond the door’s fully open position, so it doesn’t block the walkway even mid-swing.
- Seating-adjacent aisles should lean toward the wider end of that range, since a stool pulled halfway out effectively narrows the path by another foot or more.
Orientation matters just as much as the numbers on a tape measure. Prevailing wind direction determines whether grill smoke drifts toward your seating area, your dining table, or straight back into your own house through an open window. Site orientation and prevailing wind are essential planning considerations that many homeowners only address after the first cookout goes sideways, literally.
If your site forces a less than ideal orientation, you have two realistic fixes: a partial masonry screen that redirects airflow away from seating, or a vent hood for covered builds that pulls smoke up and out before it settles. Both are far cheaper to plan into the original build than to retrofit after the fact, which is one of the most common change orders on outdoor kitchen projects.
Materials and Weatherproofing: Covered vs. Uncovered
Whether your kitchen sits under a roof changes almost every material decision you’ll make, and it’s worth locking in early because switching materials mid-build gets expensive fast. Covered installations allow a broader range of materials and appliance options, while uncovered kitchens need components rated for direct sun, rain, freeze-thaw cycles, and snow load if you’re building in a climate like New England’s.
For uncovered kitchens, stick to materials built for full exposure:
- Marine-grade stainless steel (304 or higher) for appliances and cabinet frames, since standard stainless will streak and pit within a season or two of direct weather.
- Concrete or engineered stone counters with a sealed, nonporous finish that won’t absorb water and crack during freeze-thaw cycles.
- Composite or polymer cabinetry rather than wood or particleboard, which swells and rots under repeated rain exposure.
Covered kitchens open up more flexibility. You can consider natural stone veneers, a wider range of cabinet finishes, and even some wood accents, but ventilation becomes the tradeoff you can’t skip. A roof over a grill without a proper vent path traps heat and smoke against the ceiling, which is both uncomfortable and a fire risk over time.
Countertop choices deserve a specific note regardless of coverage. Engineered stone and granite hold up well outdoors when sealed properly, but porous natural stone like unsealed limestone or certain sandstones will stain and crack without regular maintenance. Concrete counters split the difference: durable and customizable, but they need resealing every year or two to stay watertight.
Cabinetry is where long-term maintenance costs hide. Stainless and polymer cabinets cost more upfront but need almost no seasonal upkeep. Painted or stained wood cabinets look warmer initially but require recoating and moisture checks every season, which adds up over a decade of ownership.
Appliances and Features to Plan For
Every outdoor kitchen needs a short list of essentials before it earns a single “nice to have” upgrade. Getting this hierarchy backward, buying a pizza oven before securing a functional prep counter, is a common and avoidable planning mistake.
Essentials:
- A grill sized to your typical group count, not your biggest party of the year.
- Adequate prep counter space on at least one side of the grill, ideally both.
- A trash and recycling pull-out built into the cabinetry, not a freestanding can that clutters the walkway.
- A fridge or cooler zone positioned away from direct grill heat.
Optional but popular:
- A pizza oven, which changes the footprint math since most units need their own dedicated counter depth.
- Side burners for sauces or side dishes that don’t belong on the main grill.
- A warming drawer for holding food while the rest of a meal finishes.
- A beverage center or wine fridge, which is more about entertaining flow than cooking function.
Before appliances go anywhere, utilities need to be locked in. Plan for a gas line if you’re running a natural gas grill or side burner, dedicated electrical circuits for a fridge or lighting, GFCI outlets rated for outdoor use near any water source, and a supply line plus drain if you’re adding a sink. Consulting a licensed contractor for gas, electrical, and plumbing work isn’t optional in most towns, and skipping it is the fastest way to fail an inspection.
Compact footprints don’t have to mean fewer features. Modular appliance drawers, stacked storage columns, and combination units (a grill with a built-in side burner, for example) let a smaller layout punch above its footprint.
25 Layout Ideas by Yard Type
Different yards call for different solutions, and the fastest way to find your starting point is to match your site conditions to a concept below rather than starting from a blank page.
- Narrow side yard: A single linear run along the fence line, 8 to 10 feet, with the grill centered and storage on either end.
- Compact deck: A 6-foot linear kitchen with a fold-down side counter to reclaim space when not cooking. Check load ratings before building; a deck-mounted outdoor kitchen carries structural requirements a ground-level patio doesn’t.
- Small patio, casual cook: An L-shape with a 6-foot cooking leg and a 4-foot bar leg for two or three guests.
- Small patio, frequent host: The same L-shape but with the bar leg extended to 6 feet and stool seating on the outer edge.
- Island centerpiece: A freestanding island in the middle of a larger patio, with full walk-around clearance on all four sides.
- Corner wrap: A peninsula extending from an existing exterior wall, ideal when you already have a covered porch edge to build from.
- Poolside linear: A straight run set back at least 6 feet from the pool edge to keep grease and smoke away from swimmers.
- Poolside L-shape: An L-shape with the seating leg facing the pool and the cooking leg set behind it, away from splash zones.
- Split-level yard, upper tier: Place the kitchen on the upper level near the house for shorter utility runs, with dining on the lower tier.
- Split-level yard, lower tier: If the lower tier gets more sun and privacy, run gas and water lines down and anchor the kitchen there instead.
- Enclosed outdoor room: A U-shape kitchen inside a screened or pergola-covered structure, built for near year-round use.
- Covered galley for rain-heavy climates: Two parallel counters under a solid roof; covered galley designs handle variable weather better than open layouts.
- Open-air entertaining hub: A large U-shape with an attached bar, built for groups of ten or more.
- Minimalist weekend grill station: Just a grill cart and a small side table, no permanent structure, for renters or first-time owners testing the concept.
- Family backyard with kids: An L-shape with the grill leg facing away from the play area and a low wall separating cooking heat from foot traffic.
- Narrow urban backyard: A vertical-storage linear kitchen that uses wall-mounted shelving above the counter to save floor footprint.
- Sloped yard: A retaining wall-backed patio leveled specifically for the kitchen footprint, since uneven ground undermines appliance stability.
- Wraparound porch conversion: A linear kitchen built into an existing covered porch, taking advantage of the roofline already in place.
- Detached pavilion: A full U-shape kitchen inside a standalone structure away from the house, useful when smoke or noise near windows is a concern.
- Fire pit-adjacent layout: An L-shape positioned so the seating leg faces a separate fire pit area, keeping two heat sources at a safe distance from each other.
- Guest house or pool house kitchen: A galley layout tucked against an accessory structure, sharing utility lines with the building’s existing plumbing.
- Multigenerational entertaining space: A U-shape with a lowered counter section for wheelchair or seated access alongside standard-height prep space.
- Four-season sunroom-adjacent kitchen: A covered linear kitchen positioned just outside a sunroom door for easy indoor-outdoor serving.
- Vegetable garden-adjacent kitchen: A compact L-shape near a raised garden bed, prioritizing a sink for quick produce rinsing.
- Formal dining-focused layout: A corner/peninsula design that leaves the majority of the patio open for a large dining table rather than kitchen footprint.
Planning Checklist and Budget Signposts
Moving from inspiration to a buildable plan follows a fairly consistent sequence, and skipping steps here is what turns a straightforward project into a change-order headache.
- Measure the site including slope, setbacks from property lines, and distance from the house.
- Map existing utilities (gas, water, electrical) to estimate how far new lines need to run.
- Check local setbacks and permit requirements before finalizing footprint or appliance placement.
- Tape out a mockup on the patio surface using painter’s tape to test real clearances and door swings.
- Confirm ventilation and combustible-material clearance, especially for covered builds or homes with vinyl siding nearby.
- Get at least two contractor estimates before committing to a final material and appliance list.
Licensed trades should handle gas line runs, electrical circuit installation, and any plumbing tied into your home’s main supply. A permit red flag worth watching for: if a contractor tells you gas or electrical work doesn’t need a permit in your town, verify that directly with your local building department before signing anything.
Pro Tip: Ask any contractor bid to break out labor, materials, and utility work as separate line items. A vague lump-sum number makes it nearly impossible to compare estimates apples to apples.
Cost varies widely based on footprint, appliance count, and whether the kitchen is covered, but Divine Landscaping’s cost benchmarks for New Hampshire projects give a useful local reference point before you start collecting quotes.
Hands-On Planning Tips From Divine Landscaping
The tape-out method is the single most useful step in this entire process, and it costs nothing but a roll of painter’s tape and an afternoon. Mark your proposed counter edges, appliance footprints, and walkway boundaries directly on the patio surface at full scale. Then walk it. Open an imaginary fridge door. Reach for a plate. Sit on a stool and check whether your knees clear the counter overhang. Problems that are invisible on a scaled drawing show up immediately at full size.
Custom outdoor living spaces often include outdoor kitchens integrated with patios, retaining walls, and lighting. Regional material choices matter here: New England’s freeze-thaw cycles are harder on porous stone and untreated wood than they are on sealed concrete or composite cabinetry, which is why covered builds are especially popular for homeowners planning year-round use. If you want to see how different layouts translate into finished projects, the outdoor living project gallery is worth a look before you finalize your own plan.
Accessibility and Universal Design in Outdoor Kitchens
An outdoor kitchen built only for the person who cooks today often stops working the moment mobility changes for anyone in the household. Universal design principles borrowed from indoor kitchen planning apply just as directly outside, and they cost very little to build in from the start compared to retrofitting later.
Counter height is the first consideration. A standard 36-inch counter works for most standing cooks, but a lowered section around 30 to 32 inches accommodates seated use or a wheelchair, and it’s far easier to build that variation into the original layout than to add it after the concrete is poured. Aisle widths that already meet the 42 to 48-inch clearance range for cooking efficiency also happen to work well for wheelchair turning radius, so the two goals reinforce each other rather than compete.
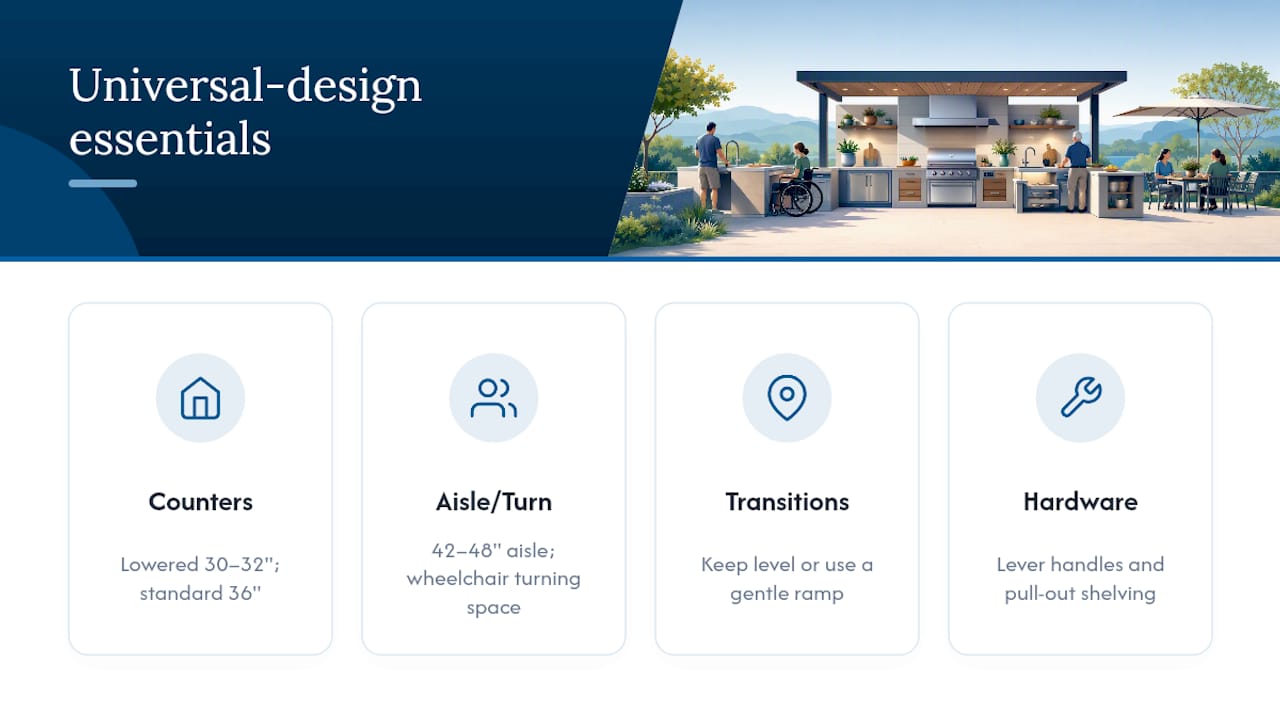
Surface transitions matter more outdoors than in. A single unmarked step between the patio and the kitchen zone is a tripping hazard for anyone, not just guests with limited mobility. Keeping the kitchen area level with the surrounding patio, or using a gentle ramp instead of a step where grade changes are unavoidable, removes that risk entirely.
Lever-style handles on cabinets and drawers require less grip strength than knobs, and pull-out shelving reduces the need to bend or reach deep into a cabinet. None of these choices announce themselves as accessibility features. They simply make the kitchen easier to use for a wider range of people over the life of the home, including the same homeowner years down the road.
Seating and Dining Integration
The kitchen and the dining area should be designed as one connected space, not two separate projects that happen to share a patio. The most common integration mistake is placing a dining table directly in the walking path between the grill and the prep counter, which turns every meal into a game of squeezing past chairs while carrying hot food.
An L-shape or peninsula layout naturally solves this by using one leg of the counter as a bar-height serving edge, letting guests sit close to the action without standing inside the actual work zone. For layouts without a built-in bar, positioning the dining table perpendicular to the cooking zone, rather than directly behind it, keeps foot traffic from crossing the workflow described earlier in the cold-to-serve sequence.
Distance matters too. A table set too far from the kitchen means food loses heat before it reaches the plate, especially in cooler New England evenings. A table set too close means smoke, heat, and clutter from active cooking. A gap of roughly 6 to 10 feet, depending on grill size and smoke behavior, tends to hit the balance most homeowners are happy with.
Covered structures raise the stakes on this integration since a shared roof over both kitchen and dining creates one continuous room. That single-room feel is part of why covered layouts read as more finished and functional, but it also means ventilation planning has to account for both zones, not just the cooking area.
Lighting Design and Placement
Outdoor kitchen lighting needs to do three separate jobs: task lighting for safe food prep, ambient lighting for the dining and seating area, and safety lighting for step edges and walkways. Treating all three as one generic lighting plan is why so many outdoor kitchens look great at dusk and become nearly unusable an hour later.
Task lighting belongs directly over the prep counter and grill, ideally under-cabinet LED strips or a mounted fixture bright enough to see a cutting board clearly without glare bouncing off stainless steel surfaces. Warmer color temperatures (around 2700 to 3000 Kelvin) feel more inviting for dining areas, while slightly cooler, brighter light works better for the actual cooking zone where precision matters.
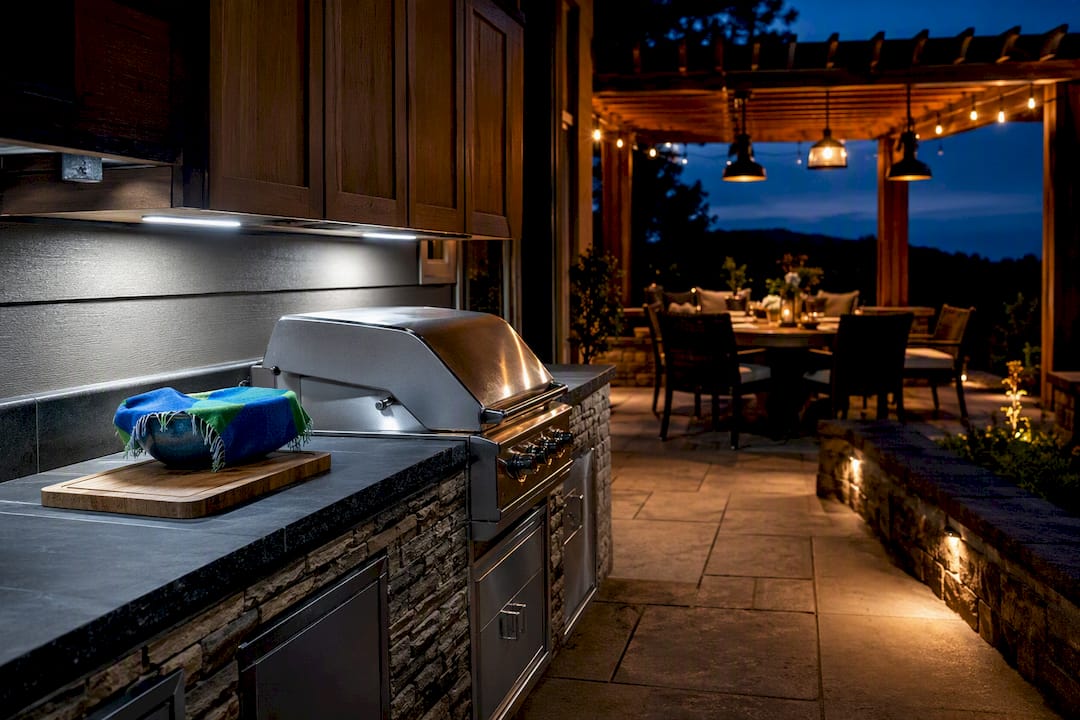
Ambient lighting, string lights, pendant fixtures, or a fire feature, sets the mood for the seating and dining zones without competing with task lighting for attention. Pathway and step lighting is a safety requirement more than an aesthetic choice: any elevation change near the kitchen, from a single step to a full staircase, needs low-level lighting that won’t blind anyone walking past but clearly marks the edge.
Plan electrical circuits for lighting at the same time you plan for appliances. Retrofitting wiring after a patio is finished costs significantly more than running conduit during the initial build.
Storage Solutions and Outdoor Cabinetry
Storage in an outdoor kitchen has to survive conditions indoor cabinetry never faces: temperature swings, moisture, UV exposure, and in many climates, freezing winters. The cabinetry material decision made earlier in the covered versus uncovered discussion carries directly into storage planning, since the same weather exposure that threatens countertops threatens cabinet boxes and hardware just as much.
Stainless steel cabinetry remains the most weather-resistant option for uncovered kitchens, though marine-grade 304 stainless resists rust and pitting far better than standard-grade steel, which matters most within a few miles of salt water or during New Hampshire’s harsh winter road salt season. Polymer and high-density polyethylene cabinets offer a lighter-weight, lower-cost alternative that won’t rust at all, though they can fade slightly over years of direct sun exposure.
Vertical storage solves the problem compact layouts face most often: not enough floor footprint for everything a household wants to store. Wall-mounted shelving above a linear counter, tall narrow cabinets flanking a grill, and stacked drawer units all add capacity without expanding the kitchen’s physical footprint.
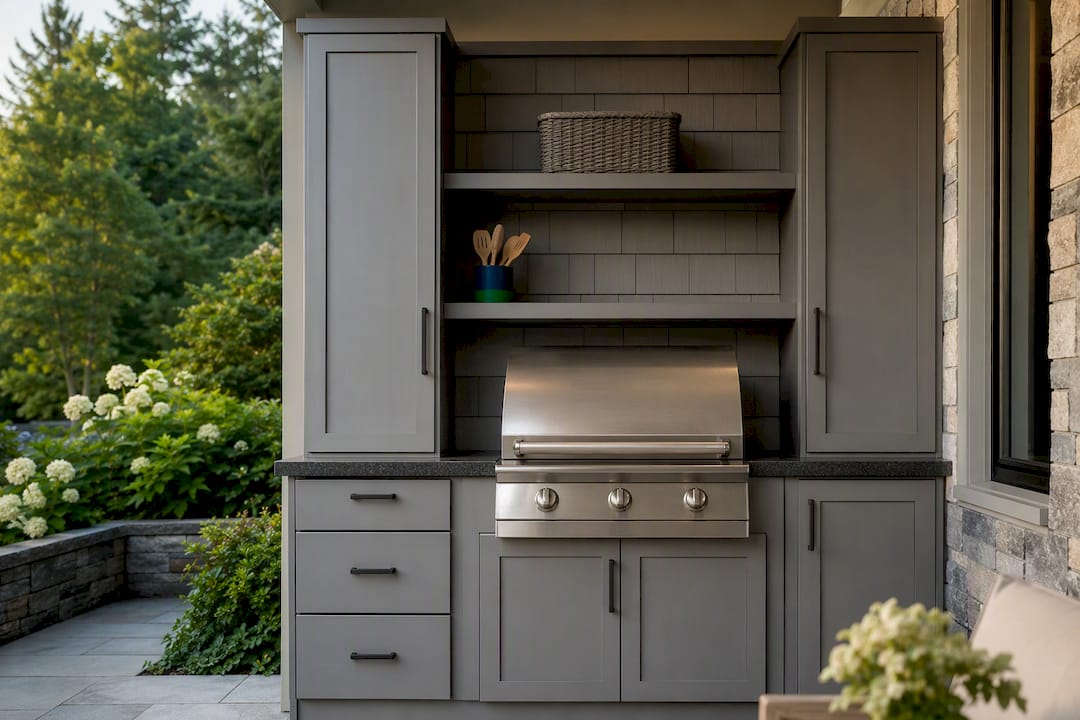
Drawer organization matters as much as raw capacity. Dedicated pull-outs for trash and recycling keep bins out of the main walkway, while shallow drawers near the prep zone hold utensils and tools exactly where they’re used instead of buried in a deep cabinet across the layout.
Fire Safety and Ventilation in Outdoor Kitchen Design
Fire safety in outdoor kitchen layouts comes down to distance, ventilation, and material choice, and all three need to be settled before construction starts rather than adjusted after the fact. Grills should be kept at least 10 feet from the house in many appliance guidelines, a clearance that protects siding, eaves, and windows from radiant heat and stray sparks.
Combustible materials near the cooking zone deserve the same scrutiny. Untreated wood decking directly beneath a grill, vinyl siding within a few feet of an open flame, and overhanging plants or umbrella fabric near the cooking area are common oversights that turn a minor grease flare-up into a real hazard. Noncombustible surfaces, concrete, stone, or fire-rated pavers, directly under and around the grill reduce that risk substantially.
Ventilation is the piece homeowners with covered kitchens overlook most often. A roof over a grill without a vent hood or open-air gap traps smoke, heat, and carbon monoxide against the ceiling structure, which is uncomfortable at best and dangerous at worst in an enclosed or partially enclosed space. Any fully enclosed outdoor kitchen room needs a vent hood rated for the appliance beneath it, not just an open window and a hope that airflow handles the rest.
A fire extinguisher rated for grease fires, kept within reach but not directly beside the grill, rounds out a genuinely safe layout. It’s a small addition that costs little and matters enormously the one time you actually need it.
A Build-First Take on Outdoor Kitchen Layout Ideas
Most layout advice treats inspiration and planning as two separate stages, browse the pretty pictures first, then worry about clearances later. That order is backward, and it’s why so many finished outdoor kitchens look right in photos but feel wrong to actually cook in. The layout ideas that matter are the ones tested against a tape measure and a roll of painter’s tape before a single stone gets set.
The conventional wisdom oversells shape and undersells sequence. An L-shape versus a U-shape matters less than whether your cold-to-serve workflow actually avoids foot traffic and whether your grill’s smoke path avoids your own dining table. Homeowners fixate on square footage when the real constraint is almost always the 42-inch aisle nobody accounted for until the fridge door wouldn’t fully open.
If there’s one priority worth acting on before any other, it’s this: walk your tape-out mockup before you fall in love with a material palette. Covered versus uncovered, stone versus composite, none of it matters if the bones of the layout don’t work for how you actually cook.
— Damian
How Divine Landscaping Turns These Ideas Into a Finished Kitchen
Reading through layout shapes, clearance numbers, and material tradeoffs is useful up to the point where you need professional help to level a patio, run a gas line, and pour a footing that will hold up in your climate. Design and build services bring outdoor kitchens, patios, and hardscape work together into one finished space.

Modular kits and DIY builds work fine for a simple cart-and-table setup, but once your plan involves gas lines, dedicated electrical circuits, plumbing for a sink, or a full masonry footprint, permits and licensed trade work become part of the project whether you build it yourself or hire it out. Professional contractors handle design, hardscape construction, and the outdoor kitchen build as one coordinated project, so the layout you tape out on your patio this weekend can become a functional cooking space.
If you’re ready to move past planning and see what a custom layout looks like on your own property, explore the hardscape services page or request a site visit to talk through your yard’s specific footprint and site conditions.
Where to Go Next for Specs, Diagrams, and Design Ideas
For readers who want to keep researching before committing to a layout, a few resources are worth bookmarking. Backyard Discovery’s layout breakdown covers footprint specifics for each shape in more depth. The Decor Root’s design roundup offers visual inspiration across 25 real builds. For plumbing considerations in cold climates, AG-Plumbing’s winterization guide covers what covered and year-round kitchens need to know. To see finished local projects, visit Divine Landscaping’s gallery.
Sources
- Outdoor Kitchen Layouts: L-Shape, Linear, Galley & Corner
- How to design and build an outdoor kitchen
- Outdoor Kitchen Layout Ideas: 25 Designs That Actually Work