
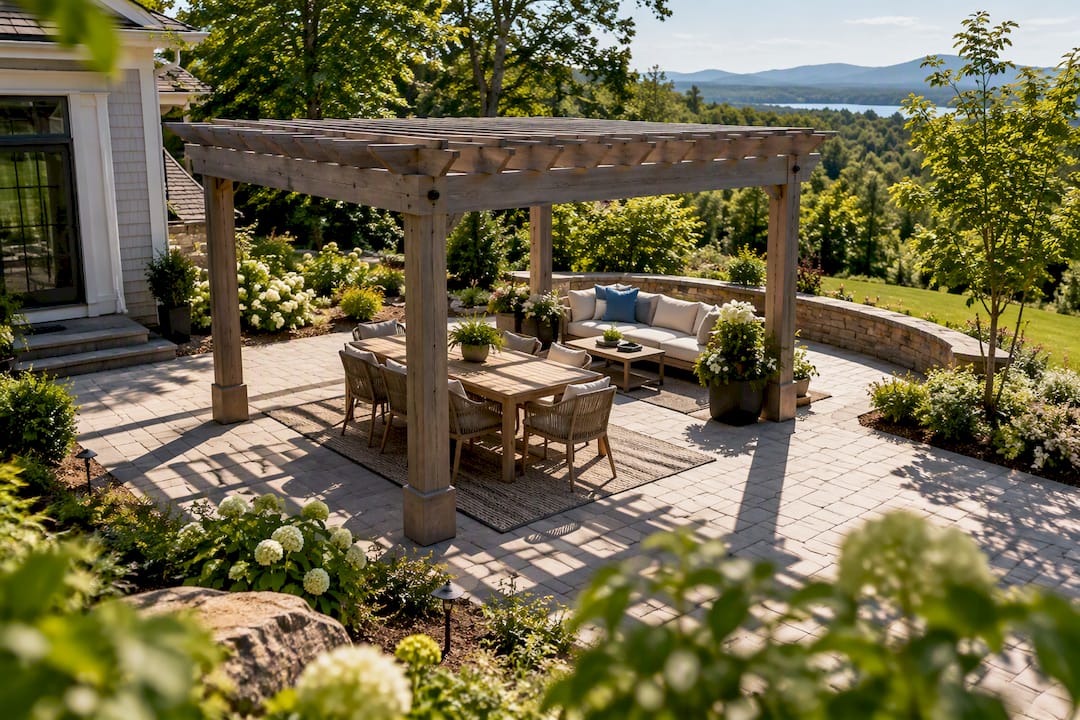
The right pergola size matches your patio’s primary use and covers about 25% to 40% of the total patio area, keeping the structure in proportion without crowding your outdoor space. A cozy bistro setup fits comfortably under an 8×8 to 10×10 pergola, while a dining and lounge combination usually needs 12×16 to 14×20. Before finalizing dimensions, confirm you have 3 feet of clearance around furniture and check whether your span approaches 18 feet, which often calls for engineered support.
TL;DR:
- Pergolas should cover around 25% to 40% of the patio area, with sizes adjusted based on specific use cases like dining, lounging, or outdoor kitchens.
- Clearance around furniture and support posts must be at least 3 feet to ensure comfort and safety, influencing overall size and layout.
- Spans exceeding approximately 18 feet between posts typically require engineered beams, especially for heavy or motorized roofs, to ensure structural integrity.
- Local climate conditions such as snow load, wind exposure, and frost depth significantly impact post size, footing depth, and material choice.
- Proper site measurement, furniture placement, and testing the footprint on-site before building help prevent cramped spaces and structural issues.
Table of Contents
- Pergola sizes by patio use: bistro, dining, lounge, and more
- How big should a pergola be relative to your patio?
- Clearance rules that keep your patio comfortable
- When span limits mean you need an engineer
- Choosing posts, footings, and the right height
- How to measure and test your pergola footprint before building
- What pergolas cost by size and material
- Field-tested advice from Divine Landscaping
- Climate and weather factors that affect pergola size and materials
- How pergola size affects shade and sun exposure
- Sizing a pergola for square, rectangular, and irregular patios
- Should you hire a pro or handle pergola sizing yourself?
- How Divine Landscaping helps you get pergola size right
- Sources
- FAQ
Pergola sizes by patio use: bistro, dining, lounge, and more
Your pergola should start with a simple question: what will you actually do under it? A footprint sized for morning coffee looks very different from one built to shelter a full outdoor kitchen.
- Bistro or reading nook: An 8×8 to 10×10 footprint covers a small table and two chairs with room to push back and stand.
- 4 to 6 person dining: Plan for 12×14, which gives a dining table breathing room plus a walking lane on each side.
- Lounge or sectional seating: 12×16 to 14×18 accommodates a sectional, a coffee table, and side tables without feeling packed.
- Outdoor kitchen: 14×20 or larger allows for counter space, a grill island, and a separate dining zone under the same roofline.
- Hot tub area: 10×10 to 12×12 covers the tub itself, though most homeowners add a walkway strip outside that footprint for towels and steps.
As a rule of thumb, add 2 to 4 feet in one dimension for every extra seat, appliance, or storage piece you plan to include. A four-person dining pergola that grows into a six-person setup typically needs the added length on one side rather than a full resize.
Service access matters too. Outdoor kitchens need clearance behind the grill for a cook to move freely, and hot tub areas need dry footing nearby so wet feet aren’t stepping directly onto smooth pavers.
How big should a pergola be relative to your patio?
Getting the proportions right is mostly arithmetic. Design guidance commonly recommends covering roughly 25% to 40% of the patio area with the pergola structure, which helps keep the space feeling visually balanced and open.
Take a 20×20 patio, which totals 400 square feet. A pergola between 100 and 160 square feet fits that guideline, meaning something in the range of 10×10 to 12×13 would read as well-balanced on that footprint.
Beyond area, shape matters. A rectangular footprint close to a 1.6:1 ratio (roughly 12×19 rather than a perfect square) tends to look more intentional and less like an afterthought that was bolted onto the house.
There are reasons to push past 40%, particularly if you want continuous shade over an entire seating and dining combination, need privacy screening on multiple sides, or are covering a small patio where a partial roof would look oddly clipped.
Clearance rules that keep your patio comfortable
A pergola that looks right on paper can still feel cramped once furniture and people are in the space. The most reliable fix is a simple one: leave about 3 feet of clearance between furniture, support posts, and any walking path.
- 4-person dining table: needs at least 8×10 feet to seat everyone with chairs pulled out.
- 6-person dining table: needs roughly 10×12 feet for the same comfort margin.
- Sectional seating: typically needs a 12×12 footprint once you account for the coffee table and side clearance.
- Fire pit seating: works best with a 12 to 14 foot circle so chairs can shift back from the heat.
- Hot tub area: needs 10×10 to 12×12 plus a dry walkway leading in and out.
Our internal patio size guide breaks these clearances down further if you’re planning furniture placement before the structure goes in.
Lighting, fans, and motorized louver controls all need placement thought too. Keep fixtures centered over seating rather than walkways, and route any electrical or motor components along a beam rather than through open rafter spans where they’ll be visible and exposed.
Pro Tip: Tape off your proposed footprint on the actual patio and set your real furniture inside it before you commit to final dimensions.
When span limits mean you need an engineer
Lumber has limits, and pergola design has to respect them the same way deck framing does. The Residential Wood Deck Design guide (DCA 6) from the American Wood Council provides prescriptive spans for common lumber sizes under standard load assumptions, and those tables are a useful reference point even though pergolas carry lighter loads than decks.
DCA 6 assumes a 40 psf live load and a 10 psf dead load for its prescriptive span tables, which is a heavier standard than most pergolas need but gives a conservative baseline for span planning.
Spans that exceed typical prescriptive lengths, generally around 18 feet, usually require an engineered beam design rather than off-the-shelf lumber sizing. That 18 foot mark isn’t a hard law, but it’s the point where most standard joist and beam layouts stop covering the distance safely without a custom calculation.
A few signs your pergola design needs engineering input rather than a standard build:
- Any unsupported span approaching or exceeding 18 feet between posts.
- Heavy louvered or motorized roof systems that add substantial dead load.
- Rooftop or ledger attachments to the house rather than freestanding posts.
- Unusual site conditions like sloped grade or soft soil under footings.
Span tables also shift with lumber species, grade, and moisture content, so a beam that works in one region’s typical lumber supply might fall short elsewhere. A contractor working from local lumber stock should confirm actual span ratings rather than relying on generic figures.
Choosing posts, footings, and the right height
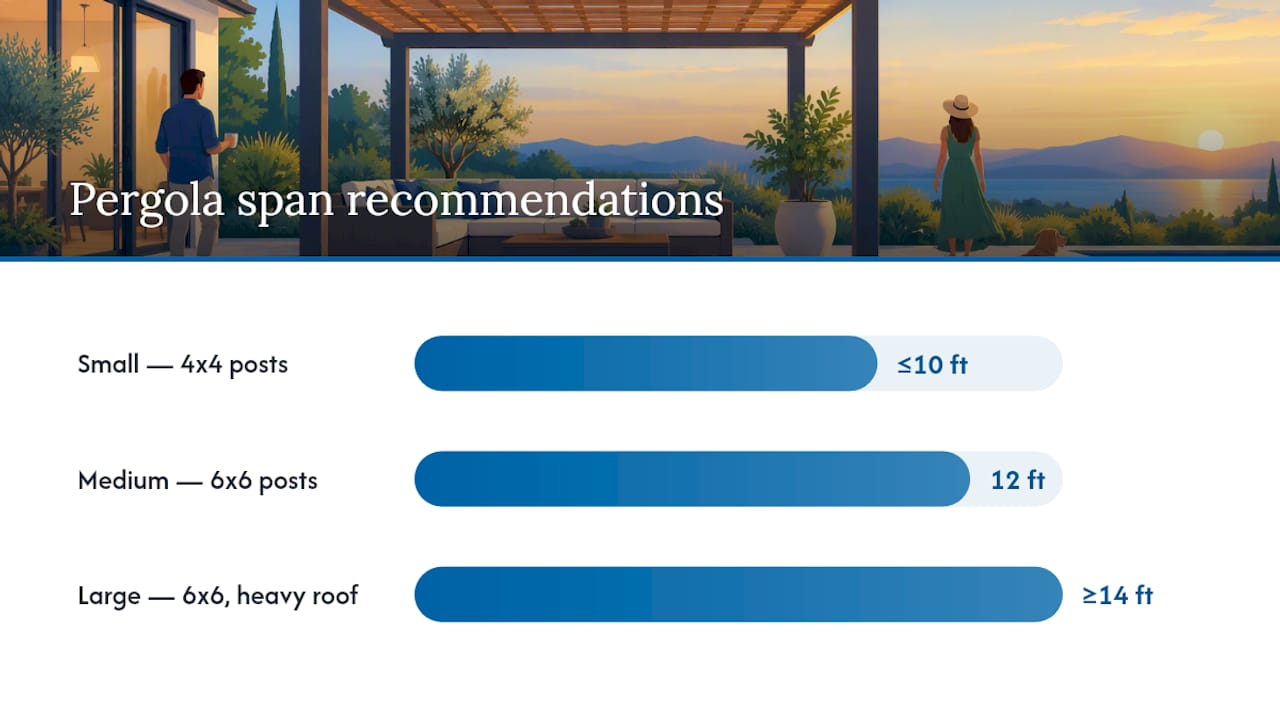
Post size comes down to span and load, not personal preference. 4×4 posts are generally acceptable for smaller pergolas with modest spans and light roof loads, think bistro or small dining setups under 10×10. 6×6 posts are the better call once you’re spanning wider openings, supporting a heavier louvered roof, or building anything over 12×14, since the added mass resists twisting and wind load far better.
Footings need to go below your region’s frost line, which varies by climate and should be confirmed locally rather than guessed. Field experience across freeze-thaw climates shows improper footings are a frequent cause of structural failure in outdoor structures, so this isn’t a step worth shortcutting. Poured concrete footings sized to depth and diameter for your soil type generally outperform surface anchors for anything beyond a small kit pergola.
- Small kits and light structures: surface anchors or shallow footings may be adequate.
- Custom builds with 6×6 posts: poured footings set to frost depth are the safer standard.
- Heavier louvered or motorized systems: footings should be sized with the added roof weight in mind.
Height affects both feel and function. 8 feet is a common minimum for a low, intimate feel, while 9 to 12 feet gives enough headroom for ceiling fans, lighting fixtures, or motorized louver hardware without the structure feeling like it’s pressing down on the seating below.
How to measure and test your pergola footprint before building
You don’t need to guess. A short on-site test catches problems that measurements on paper tend to miss.
- Measure your patio’s full length and width, then note any slope or drainage direction.
- Decide your primary use (dining, lounge, kitchen) so you’re sizing around a real purpose.
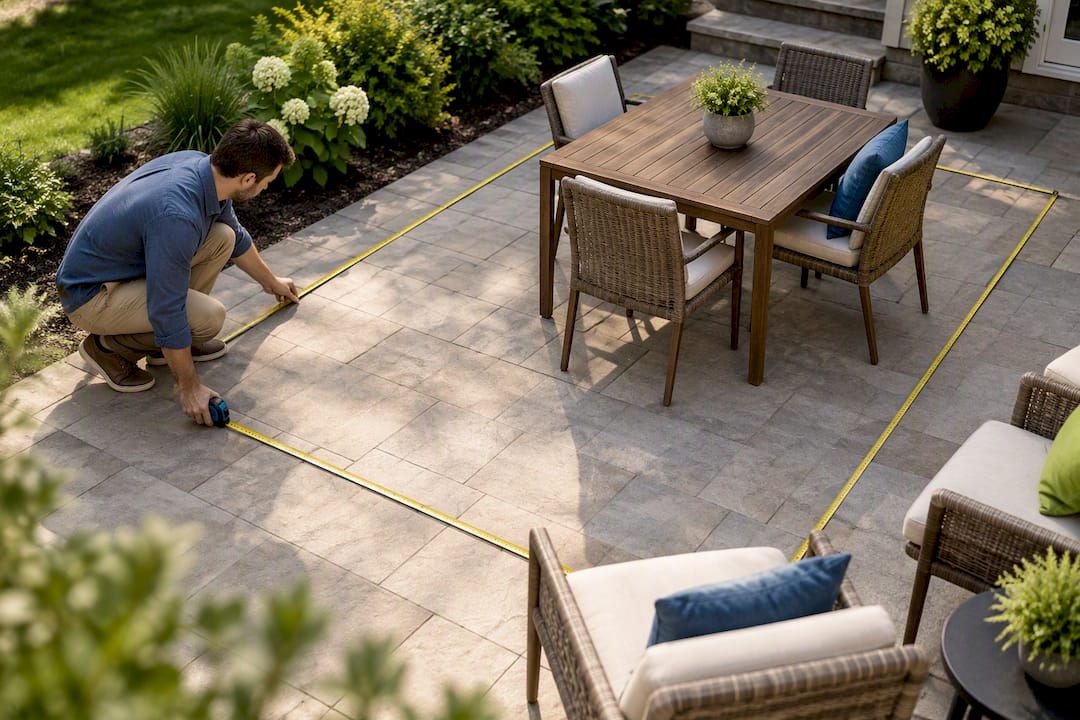
- Stake or tape the proposed footprint directly on the patio surface.
- Move your actual furniture into that taped area, not stand-in boxes or guesses.
- Walk the circulation paths around furniture and through doorways to confirm nothing feels tight.
While you’re out there, check a few details that are easy to miss on a drawing: door swings that might hit a post, sightlines from inside the house, existing drainage paths, buried utility lines, and roof eaves or overhangs that could conflict with your planned height. Our guide on planning a backyard patio layout walks through these checks in more detail.
If the taped footprint feels tight once furniture is in place, or if you discover a slope pulling water toward the house, adjust the dimensions or shift the placement before you order materials.
Pro Tip: Leave the tape down for a few days and use the space as if the pergola were already built. You’ll notice clearance problems faster in real use than on paper.
What pergolas cost by size and material
Cost scales with both footprint and system type, and the two variables don’t always move together. A small kit pergola and a mid-size custom build can land in similar price territory depending on materials and site conditions.
- 10×10 kit pergola: the most budget-friendly option, typically using pre-cut lumber or aluminum components with straightforward footings.
- 12×16 custom wood build: higher material and labor costs, but allows for exact sizing, upgraded lumber grades, and finish details a kit can’t match.
- 14×20 louvered aluminum system: the highest cost tier due to motorized components, engineered load paths, and often electrical integration.
Site prep and footings materially change the final number on any of these builds. Uneven grade, poor soil, or a need to break out existing concrete before pouring new footings can add cost regardless of pergola size.
The main cost drivers worth budgeting for: material choice, site preparation and footing work, labor hours, any electrical runs for lighting or motorized louvers, and permit fees where required. Our pergola cost breakdown covers these factors in more detail if you’re building a project budget.
A reasonable contingency is worth planning into any quote, since footing conditions and permit requirements sometimes surface only once work begins. Spending more upfront on proper footings and quality lumber connections generally means fewer repairs from movement or rot down the line.
Field-tested advice from Divine Landscaping
The most common mistake we see is a pergola sized to the patio rather than to the furniture underneath it, which leaves either a structure that dwarfs a small seating area or one so tight that chairs bump the posts. The second most common issue is a footing depth chosen by guesswork rather than by checking the local frost line.
On smaller or oddly shaped patios, staggering the rafter spacing or setting the pergola slightly off-center can preserve a walking path without shrinking the usable seating area. These are compromises worth discussing with a designer rather than defaulting to a smaller structure across the board.
Before hiring a contractor, ask about footing depth for your specific soil, examples of completed projects near your size range, realistic timelines, permit handling, and what’s covered under warranty. Those five questions tend to separate a contractor who’s done the planning from one who’s guessing along with you.
— Damian
Climate and weather factors that affect pergola size and materials
Where you live shapes both the size and the material choice more than most homeowners expect going in. Regions with heavy snow load need beams and posts sized for that weight, which sometimes pushes a design toward 6×6 posts even on a footprint that would otherwise call for 4×4. Wind exposure matters similarly, particularly on open lots or waterfront patios where a taller or wider structure catches more load.
Freeze-thaw cycles common in colder climates put real stress on footings, and a footing poured above the frost line is one of the more common points of failure in outdoor structures over time. That’s a reason to size footings by local frost depth rather than by a flat number pulled from a general guide.
Material choice interacts with climate too. Cedar and pressure-treated lumber handle moisture differently than vinyl or aluminum, and a louvered aluminum roof holds up differently under heavy snow than an open lattice design. None of this changes the footprint math from earlier sections, but it does change what beam sizes and footing depths are appropriate for that footprint in your specific climate.
If you’re planning a build for year-round use rather than a three-season structure, factor snow load and wind exposure into the conversation with your contractor from the start rather than after materials are ordered.
How pergola size affects shade and sun exposure
A pergola’s footprint determines not just how much space it covers, but how the shade moves across your patio through the day. A smaller structure over a dining table might shade lunch perfectly but leave the same table in direct sun by late afternoon as the angle shifts.
Larger footprints and taller structures cast a wider shadow that holds steadier through changing sun angles, which matters most for spaces used across a full afternoon rather than a single meal. Orientation plays into this as much as size: a pergola positioned to block afternoon sun from the west will feel different from one primarily shading a morning breakfast nook facing east.
Rafter spacing and any add-on shade cloth or retractable canopy also shift how much direct sun filters through, independent of the footprint itself. A wider structure with open rafter spacing can still let in more sun than a smaller one with a tight lattice pattern.
If shade timing matters more than square footage to you, it’s worth mapping how the sun crosses your specific patio before finalizing size and placement rather than relying on general orientation rules.
Sizing a pergola for square, rectangular, and irregular patios
Patio shape changes how a pergola footprint should be planned, even when the square footage guideline stays the same. A square patio generally pairs well with a pergola close to that same square proportion, though shifting to a 1.6:1 rectangle within that footprint (as discussed earlier) often reads better visually than mirroring the patio exactly.
A rectangular patio usually gives the most flexibility, since the pergola can run the shorter dimension for a cozier feel or stretch along the longer axis to cover a dining and lounge combination under one roofline.
Irregular patios, common with curved edges or multi-level hardscape, need a different approach. Rather than trying to match the pergola to the full irregular outline, pick the most-used rectangular or square section of the patio and size the pergola to that zone specifically, leaving the remaining irregular area as open hardscape or planting space. Our modern outdoor living ideas page shows a few examples of pergolas placed within larger irregular patio layouts.
Should you hire a pro or handle pergola sizing yourself?
A small kit pergola with minor footings and no electrical work is a reasonable DIY project for a confident homeowner. Hire a professional once spans exceed 18 feet, electrical or motorized components are involved, footings get complex, or your town requires permits, since a contractor can catch structural and code issues before they become expensive fixes.
How Divine Landscaping helps you get pergola size right
Divine Landscaping LLC designs and builds custom pergolas as part of our decks and outdoor living work, and sizing is where most of the planning conversation happens. We start with a site visit to measure your patio and talk through how you actually plan to use the space, then bring back design options sized to that use rather than a generic template.

From there, we handle quoting, permit support where your project requires it, and installation, including footings set to frost depth appropriate for the site. If you’re also weighing patio surface changes alongside a pergola, our patio installation team can scope both projects together so footings and grading work in sync.
Ready to talk through sizing for your own patio? Request a quote and we’ll start with a site visit.
Sources
- Residential Wood Deck Design (DCA 6) — AWC
- How to choose the right size pergola for your backyard — Polywood
FAQ
What is the ideal size for a pergola?
There’s no single ideal size since it depends on your patio and intended use, but a common starting guideline is covering 25% to 40% of the patio area. A bistro setup often works in an 8×8 to 10×10 footprint, while dining and lounge combinations typically need 12×16 or larger.
How far can a 2×8 span for a pergola?
Span limits for a 2×8 depend on lumber species, grade, and load assumptions, so there’s no single fixed number. Prescriptive guidance like DCA 6 provides span tables for specific lumber grades, and a contractor should check the exact table for your material rather than relying on a rounded figure.
How much does it cost to build a 20×20 pergola?
Cost for a 20×20 pergola varies widely based on material choice, site prep, and whether the design includes motorized components, and no single published figure covers every project type. Our pergola cost guide breaks down the main cost drivers by material and footprint so you can budget realistically for your specific project.
Should pergola posts be 4×4 or 6×6?
4×4 posts are generally suitable for smaller pergolas with modest spans and light roof loads, such as a bistro or small dining footprint. 6×6 posts are the better choice for wider spans, heavier louvered roofs, or any structure over roughly 12×14, since the added mass handles wind and load more reliably.